Emlid Reach RS Guide #1 - Initial Reach RS setup (firmware
upgrade, renaming, and access via ReachView App)
Author: Chad Hill
Revision date: May 2019
UPDATE: This guide was originally written for an older version of the firmware that required more complex setup and did not support the ReachView app for iOS and Android. The ReachView app makes the initial setup much simpler, and the guide has been updated to reflect this.
Overview of this
guide:
- Charge and power on device
- Connect to Reach hotspot
- Access reachview
via ReachView App
- Configure reach to access local Wi-Fi
network
- Update firmware
- Label and Re-name Reach
When you first receive an Emlid,
there are some initial setup steps that you should perform regardless of the
end-use you plan for your instrument. This walkthrough will guide you through
the initial setup to upgrade your firmware and access the onboard ReachView
setup system via a web browser or iOS/Android app.
1. It is a good idea to charge the Reach RS using the supplied USB cable before initial setup or use. The Reach RS is charged via a micro USB port on the front panel. Charge the Reach for several hours via any powered USB port.
Power on
the device by holding down the power button for 3 seconds until the lights
start blinking.
The Reach will take a few moments to boot up, during which the LED lights will flash in various patterns. Eventually the light patterns should stop changing and the blue “net” LED will turn solid to indicate that the Reach has launched its own Wi-Fi Hotspot.
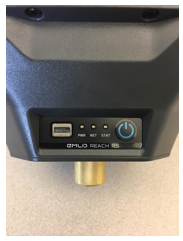
The front panel of the Reach RS showing power button and USB charge port
2. All setup of the Reach RS is accomplished via a Wi-Fi connection. The Reach RS can either launch its own Wi-Fi hotspot, allowing you to access the web interface anywhere regardless of available Wi-Fi networks, or the reach can access an existing Wi-Fi hotspot, allowing the Reach to access the internet and receive remote real-time-correction data or download firmware updates. When you first power on your Reach RS it will launch its own hotspot. You will need to configure the reach to access the internet via an external network in order to upgrade to the latest firmware.
Using a laptop, tablet, or phone with Wi-Fi capabilities, open your list of available networks and you should see one labeled reach:xx:xx.
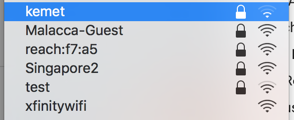
Wi-Fi list in OSX, showing Reach hotspot (in this case reach:f7:a5)
Select this hotspot and use the password “emlidreach”.
3. Since firmware 2.8.0, the Reach RS and RS+ can be accessed via an iOS or Android app called “ReachView”, rather than through a browser.
The app can be downloaded for iOS here:
https://itunes.apple.com/us/app/reachview/id1295196887?mt=8
or for Android here:
https://play.google.com/store/apps/details?id=com.reachview
If you are connected to the same network as your Reach (either the Reach-generated hotspot or a local Wi-Fi network), and you open the ReachView app, you should be presented with this screen listing any Reach units currently connected to the same network as your device:
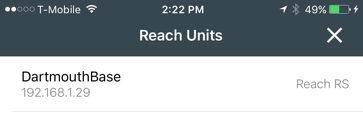
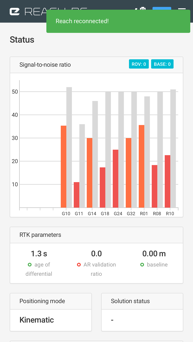
If you have multiple Reach units connected to the same network (i.e. a base and rover logged into a local router) you will see them listed here, and this is where it is helpful to have renamed your units to clearly identify them. If you are connected to the Reach-generated wifi hotspot, then you will only see the name of the Reach unit you are connected to. If you select a Reach unit on this page, you will load the standard main status page of the ReachView web interface:
4.
Connect to a local network. Press the menu
button ![]() and then select the “Wi-Fi” page.
and then select the “Wi-Fi” page.
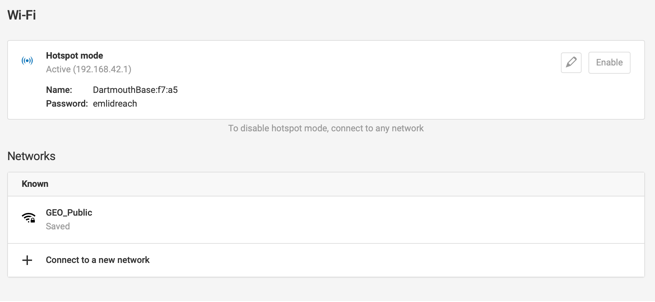
Select “Connect to a new network” and enter your local wi-fi name, security type, and password. Hit save. Then select the new network and hit “connect” You will get a message telling you to switch to that network to reconnect to your device.
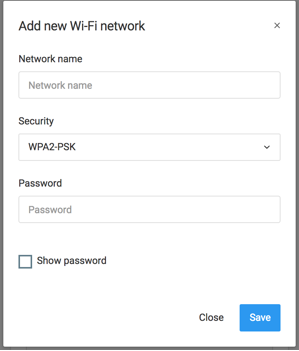
The dialogue box for entering your
Wi-Fi network info
Log in to your local network, return to ReachView, and hit the refresh
button ![]() from the main screen. Select your Reach
again. You should be back at the main status screen, but now your Reach has
access to the internet.
from the main screen. Select your Reach
again. You should be back at the main status screen, but now your Reach has
access to the internet.
n.b. You can use a
hotspot generated by an IPhone or Android cell phone, but the Reach may have
trouble logging into an iPhone hotspot if the iPhone is currently using Wi-Fi
data, even if the hotspot is launched and listed as available. One work around
is to ensure that another device is already logged in to the iPhone hotspot
before attempting to connect the Reach.
5.
Update to the latest
firmware. Press the menu button![]() and then the
“gear”
and then the
“gear” ![]() icon.
Press “Check for Updates” and then “Update ReachView” if any updates are found.
icon.
Press “Check for Updates” and then “Update ReachView” if any updates are found.
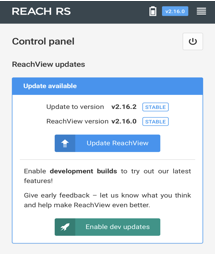
This will bring you to the
update screen. Select “Update Reach”:
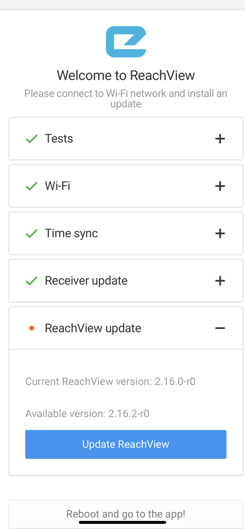
When the update completes, select “Reboot and to the the app!”
6.
If you will be using
multiple Reach RS or standard Reach units, it is a good idea to change the name
of the reach to make it easier to identify. Press the gear icon at the top of
the navigation pane on the left: ![]()
N.b. IF you are
accessing ReachView on a phone or tablet, the navigation pane may be hidden,
but can be accessed by pressing the ![]() icon.
icon.
This will bring you to the settings page:
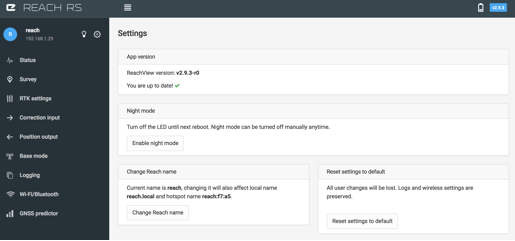
Click “Change Reach Name” and you will get the following dialogue:
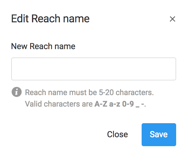
Enter an identifiable name for your Reach here. If you are going to be using a pair of Reach RS units as a base and a rover, it might be helpful to call one “Rover” and one “Base”. You cannot change the name of the Reach if it is currently in Hotspot mode, you can only change the name if it is in “client” mode and logged into a local Wi-Fi network.
Emlid also supplies a physical sticker to label the units as a Rover or a Base. Since any reach can easily be configured to act as either a Rover or Base, these digital and physical labels are purely for convenience to help keep track of which device is currently set up for which function.
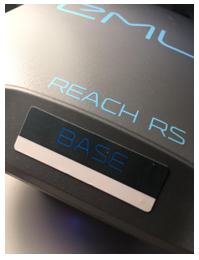
Reach RS physically labeled as a “Base”
If you have multiple Reach units
on and you are unsure which one you are currently connected to, in the
ReachView main page you can click the ![]() icon
at the top of the navigation pane and all 3 LEDs on the front of the Reach RS
will flash.
icon
at the top of the navigation pane and all 3 LEDs on the front of the Reach RS
will flash.
This should complete the initial setup for your Reach, you are now
prepared to configure your unit to act as a base station or a rover, depending
on how you intend to use it. Please see the further guides for the next steps.