Emlid Reach RS Guide #4 - Base station post processing with PPP
Author: Chad Hill
Revision date: September 2018
This guide is intended to help you establish a known position for your base station using only a single Reach RS and the free online service from Natural Resources Canada (NRCAN). Although this method will produce lower accuracy results than the previous guide, it is easier to use AND can provide results anywhere in the world, regardless of the distance to the nearest CORS station.
Overview of this
guide:
1. Purpose
2. Before Fieldwork
3. Setup and data collection in the field
4. Download Logs
5. Upload data to NRCAN
1. Purpose
When using a pair of Reach RS units in RTK mode, it is best to set up the base station over a known point. In most archaeological applications, though, there will not be a local point with known coordinates available, and in many places around the world there will not be a local source of correction data that can be used to post process a base station log to establish a known point. However, the Precise Point Positioning service provided by NRCAN https://webapp.geod.nrcan.gc.ca/geod/tools-outils/ppp.php can work with single frequency receiver data, like that obtained from an Emlid RS log, and can provide useable results for anywhere in the world. This guide will walk you processing a Reach log file to obtain useable base station coordinates. This is one of the simpler ways of obtaining a coordinate for a Reach RS base station.
N.B. Best practice
for ensuring the accuracy of your base station position would be to set up, record, and
post process your base station location for several hours over several
different days and then compare the independent post processing results. For
archaeological fieldwork, this might not be practical or possible.
2. Before Fieldwork
The hardware that will be required for establishing a base station position includes:
1. 1x Reach RS unit
2. 1x Survey Tripod
3. 1x Tribrach w/optical plummet
4. An Android or Windows Tablet for setting up/confirming the data logging
Before going to the field, ensure that your reach unit and tablet are charged. The reach is charged via a micro USB port on the front of the unit. There should also be a micro USB cable in the storage case. The Emlid should be charged completely after being plugged into any USB port for a few hours. The internal battery will power the Reach RS for many (up to 30) hours of continuous operation.
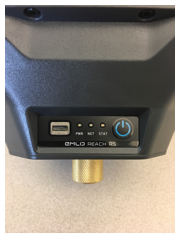
Front panel of the Reach RS: USB charge port at left, 3 status LEDs in the middle, power button on the right. Below is the brass survey tripod adaptor.
3. Setup and data collection
The goal here is to establish a point with known coordinates that can be used to set up your base station, in the future, for Real Time Kinematic (RTK) data collection. If you are going to be using the Reach units at this location repeatedly, you will want to choose or construct a monument to act as your base station point with the following in mind:
1. The point should be easy to set the base station up over
2. The point should have a clear/unobstructed view of the sky. Do not place it near trees, buildings, metal fences, etc.
3. The point should be rugged and hard to move/disturb
4. The point should be easy to re-locate in the future
For temporary points that do not need to remain in place for long term use, it may be sufficient to draw a mark on bedrock/asphalt or hammer a nail into the ground. For longer term use, it is preferable to use a more permanent object like a cemented rebar rod or survey disc.
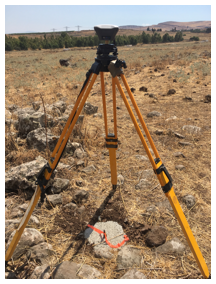
Emlid Reach RS setup on a tripod over a piece of rebar cemented in place to act as a local base station point
Once you have established a point to survey, place the survey tripod, with tribrach, over the point that will become the base station location.
Mount the Reach RS base station to the tribrach using the brass adaptor, and ensure that the reach is level and directly over the survey mark using the leveling screws and optical plummet of the tribrach:
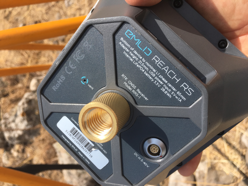
The bottom of the Reach RS, this is the location to measure to when recording HI.
Be sure to screw the external radio antenna into the bottom of the Reach RS before turning the device on!
Measure the distance (in meters) from the survey mark to the base of the receiver using a hand tape. Add 6.5mm to this measurement to get the height of the instrument (HI). Note this measurement, we will need to enter it below.
All setup of the Reach RS is accomplished
via a Wi-Fi connection and through a browser window or the “ReachView” App for
iOS and Android. The Reach RS can either connect to an external local Wi-Fi
network or generate its own Wi-Fi hotspot. The “ReachView” app can be
downloaded here for iOS:
https://itunes.apple.com/us/app/reachview/id1295196887?mt=8
Or here for Android:
https://play.google.com/store/apps/details?id=com.reachview&hl=en
N.B. You will only be able to access your Reach via
the Android and iOS apps if you have already updated your Reach RS to firmware
2.8.0 or higher. Please see the “initial setup” guide for directions on how to
connect the Reach to the internet to update firmware.
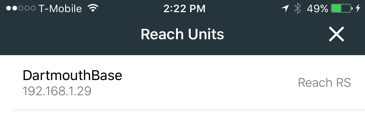
For the type of survey described here you do NOT need the base station to access the internet, so you can allow it to generate its own wifi hotspot. If you have previously configured your Reach to utilize the hotspot in your phone, you should turn your phone hotspot off so that the Reach does not log into it. When you turn on the Reach RS, it will first look for Wi-Fi networks it knows, and then create its own hotspot if it finds none. Turn on the Reach by pressing the power button for 3 seconds. The front LED lights should flash. After a few moments, the blue “Net” LED light should come on solidly to indicate the Reach RS has initiated the internal hotspot (if the blue “net” light is blinking, the Reach RS has instead logged on to an external Wi-Fi network). On your mobile device, search for available Wi-Fi networks and look for the one that is called either “reach:xx:xx” or, if you have renamed your Reach during the initial setup, it should have that name plus “:xx:xx”. In the example below, the Reach network is available as “DartmouthBase:f7:a5”. Log on to that network using the password “emlidreach” unless you previously selected a more secure password.
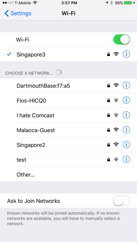
An iPhone Wi-Fi network selection window, showing “DartmouthBase:f7:a5” as an available network
Once connected to the Reach hotspot, open the “ReachView” app. You should be presented with a screen showing all available Reach units. Since you are connected to a Reach-generated hotspot, the list should only include the one Reach you are connected to:
Select this Reach and, after a loading screen, you will arrive at the main ReachView status page for this unit:
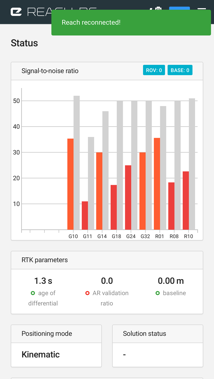
The main status page for the Reach RS
Alternatively, any time you are connected to the internal hotspot in your reach, you can always access the same status page (and all additional ReachView pages) via a web browser by entering 192.168.42.1 in the address bar.
To post process coordinates for your base station, you only need a log file. You do not need to do any other setup besides ensuring that the Reach is recording the appropriate log. In most cases, unless you have changed the default settings, the Reach should begin a new log any time it is turned on. However, it is good practice to check that the log is recording.
Select the “log” tab from the menu.
If using the reachview app on a cell phone or tablet,
the menu is accessed via the “![]() ”
button.
”
button.
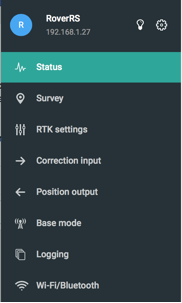
Reachview Menu – Choose “logging”
On the logging page, you should see the following screen:
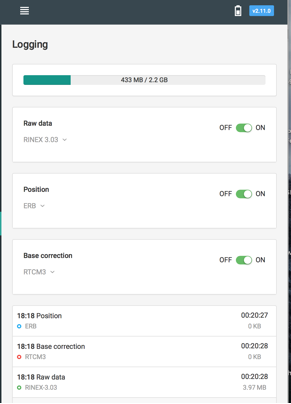
Main logging screen
Ensure that “Raw Data” is enabled and select “Rinex 3.03” as the format. The bar at the top shows how much local storage data is available. And the boxes below show that the device is currently recording 3 types of logs (position, base correction, and Raw Data). The timer at the right shows how long the active log has been recording.
Ideally, to ensure that you will have enough data to successfully post-process a base position, you should allow the Reach to record a log, while sitting over your point, for at least 2 hours. Once the reach has run for 2 hours, you can turn off the unit by pressing and holding the power button for a few seconds. The log will be finished and can be downloaded later. Ideally, you would wait a few days and then set the unit over the same point and collect another few hours of data so that you could compare independent processing results.
4. Downloading logs
When you are ready to download the log, turn the unit back on and log into it either via its wifi hotspot, or via a local router. You probably want to download the log to a computer for post processing, rather than your phone or tablet. The easiest way to do this is to allow the Reach to start its own internal hotspot by turning off any hotspots or routers that it knows. When the Reach boots up, if it does not see a local router, it will start its internal hotspot. Log into that hotspot from a laptop or desktop via wifi (default password is emlidreach). And then open a browser and enter http://192.168.42.1 in the browser bar. This should bring you back to the main status screen. Select “logging” again from the menu.
If you scroll down in the logging screen, you should see all of the previously recorded logs.
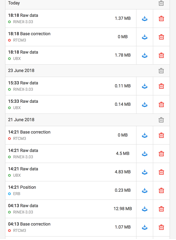
“Logging” screen, showing previously recorded logs
Find the log that corresponds to
the point you collected (based on the date and length of recording) and press
the “![]() ”
button. The log should immediately begin downloading and be saved wherever your
default downloads are stored (i.e. the “downloads” folder in a mac). The
download should end up as a zipped folder (or it may be automatically unzipped
by OSX) called “raw_YEARDATETIME_Rinex-3_03”. If necessary, unzip the folder
using a program
like “7-zip”. This folder should contain two at least two files, one with .obs and one with .nav extension. The .obs
file is the one you will need to upload.
”
button. The log should immediately begin downloading and be saved wherever your
default downloads are stored (i.e. the “downloads” folder in a mac). The
download should end up as a zipped folder (or it may be automatically unzipped
by OSX) called “raw_YEARDATETIME_Rinex-3_03”. If necessary, unzip the folder
using a program
like “7-zip”. This folder should contain two at least two files, one with .obs and one with .nav extension. The .obs
file is the one you will need to upload.
5. Uploading log to NRCAN PPP service
The last step is to upload your log to the NRCAN PPP service. Head to this website and sign up for an account if you have not already done so: (https://webapp.geod.nrcan.gc.ca/geod/tools-outils/ppp.php)
Once you have logged in, you should be on the main page of the service and it should look like this:
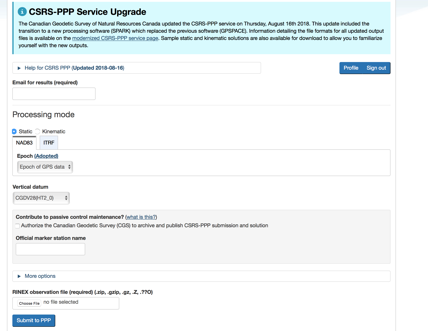
Submitting a log is relatively straightforward. Enter an email address for your result to be mailed to. Select static or kinematic processing: for processing log data from your base station select “Static”. Choose a datum: if you log data is from North America choose NAD83, otherwise you probably want to select ITRF.
Click on the “choose file” button and select the .obs file you downloaded previously.
Click on “Submit to PPP” and wait while the file uploads. Eventually you should get a message like this:
![]()
Processing usually takes a few minutes and then you will receive an email like this:
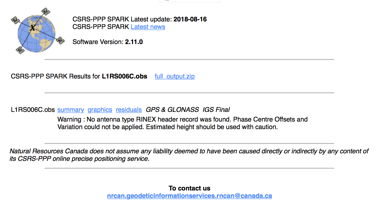
Click on the “full_output.zip” link and you should be directed to an automatic download via your default browser. When unzipped the folder will contain several documents, including a pdf that has the same name as the .obs file you submitted. This pdf contains a summary of the processing results. It should look similar to this:
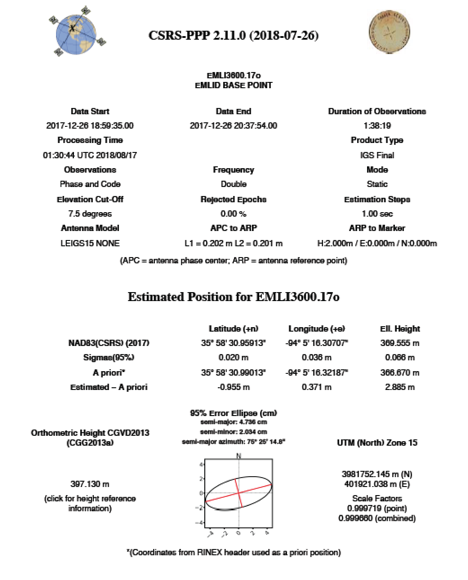
NRCan provides a guide to reading this file here: https://webapp.geod.nrcan.gc.ca/geod/tools-outils/sample_doc_files/Report_Static.pdf There are a few critical things to look at in this summary. First, the percentage of rejected epochs should be a low number. If too many of the observations had to be thrown away to arrive at a result (i.e. a large percentage of rejected epochs), you should be suspicious of the result. Second, the ARP to Marker should show the height offset as 0.00m:
![]()
This is because we did not tell the processing service the HI that you measured in the field, so it is returning the coordinates for the antenna itself, not the point below the antenna over which you have set up. N.B. the coordinate for the point on the ground, over which you have set up your base station is, therefore, the ellipsoid height listed in the results minus the HI you recorded in the field. Third, the service provides a 95% confidence interval error estimate (“Sigma (95%)”). For a dual frequency receiver, this result can be very low (in the 2-3cm range horizontal, as in the above example). However, for single frequency receivers like the Reach RS, and depending on conditions, it might be much higher. Lastly, at the top, under “product type” you will see whether the service was able to use “ultra-rapid”, “rapid”, or “final” ephemeris and clock data from the satellite constellations. For this type of processing, you are likely to get much better results if you wait until at least “rapid” results are available, and are better off waiting until “final” results are available. However, this can take more than 2 weeks, and so may not be feasible for all situations.
The results are shown under “Estimated position” in geodetic (latitude, longitude, and ellipsoid height) as well as projected (UTM northing and easting and orthometric heights where available) coordinates.